After the installation, Microsoft Word usually utilizes Calibri or Times New Roman each time you open a word document. It may not possibly be the font you would like to utilize most often in your documents. So, if you are looking for a step-by-step guide on how to change default font in word document, then this article is for you.
How to change default font in word
Changing or setting the default font in Microsoft word will take just less than 1 minute.
Step 1:
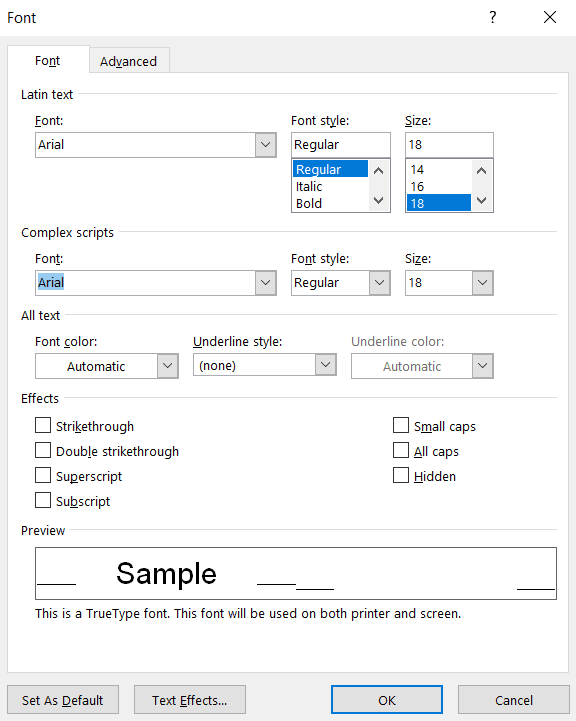
Open a Microsoft word document, press Ctrl + D to open the font toolbar.
Step 2:
In the font dialog box, select the font, font style, and font size as per your requirements, then click on the Set as default button in the bottom left corner.

Step 3:
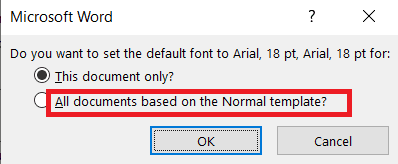
Once you have clicked on the Set as default button, you will be prompted with two options, “This document only?” and “All documents based on the standard template?“.

Step 4:
Select All documents based on the Normal template? Option and click ok to close the dialog box.
After completing the above steps, whenever you type into a new word document, font, font style, or font size specified in the settings will be applied by default.
I hope the solution provided above on how to change default font in word has helped you. If there are any other way to change or set default font in a word document let me know in the comments section.
How to delete youtube playlist
How to delete a youtube channel
How to change margins in Google docs
How to highlight in Google docs
How to change audio track in KMPlayer

